Thursday, July 29, 2010

Gig Banner


And this was the result (See previous post, "Surrealism-Inspiration" for the lead-in to this result)

Surrealism-Inspiration


For our final project, a Gig Banner, we needed
to design with a particular art genre in mind.
These images/artists were my inspiration

Tuesday, July 27, 2010

More Little Cards


The photos didn't necessarily fit precisely
to the chosen size of the card. Use of a
clipping mask trimmed the excess from the edges.

Little Cards


This project involved finding photographs,
removing their color using Photoshop and
then tinting and designing them in
Illustrator

Sunday, July 25, 2010

Packaging Design


This project was to create an envelope
and 4 thematically related cards to go
into it. Templates for the envelopes
were found at Mirkwood Designs at
www.ruthannzaroff.com.

I designed the envelope so that when the 4 "petals" are folded into place and tucked in just right to close the envelope, a starfish is created where they all meet.

8 Page Folded Book-Pages


Back Cover and Pages 5-7

8 Page Folded Book-Pages


Book Cover

Pages 2-4

8 Page Folded Book


Filled Template


This project began with creating a template for the book. The pages were filled over the course of the class. The template was for an
11" x 17" page. By folding the printed paper and then cutting a slit along the fold horizontally from the edges of the 2 central images, the page could then be folded into a book that needed no binding. I think I remember something about this being an origami technique.

Stickers


Project #2 was to design a minimum of 3 stickers. We printed them on sticker paper and the shapes could be die-cut. Fun!
These are my 3 dogs>>>>>


These flowers used the Distort Filter>>>>


I just happen to love bats :) >>>>>>

T Shirt Project and Light Rays Tutorial


This was the first of five projects that we accomplished in 6 weeks. This artwork was done by my daughter. I just added some light rays. The image was eventually flipped to a reflection, then printed on transfer paper and then pressed onto a t-shirt.

Adobe Illustrator CS5 Lesson 12


Applying Effects
Mapping Designs onto 3-D Images

Adobe Illustrator CS5 Lesson 10


Blending Colors and Shapes

Adobe Illustrator CS5 Lesson 8


Working with Layers

Adobe Illustrator CS5 Lesson 7


Working with Type

Adobe Illustrator CS5 Lesson 5


Drawing with the Pen and Pencil Tools

Adobe Illustrator CS5 Lesson 3


Creating and Editing Shapes

Tutorials-Distort Filter Flowers


These flowers were created from a technique described by Laurie Grace. A basic flower shape is created by nesting progressively smaller, irregular circles within each other. The basic shape is then altered using Illustrator's "distort" filter. The possibilities are ENDLESS.

Tutorials-EleFonts and Text Effects


EleFonts are creatures that are drawn using text. Sometimes it can be done with just the letters
which spell the creature's name. The idea is to stick with only 1 font family per drawing and to use font that is appropriate for the creature being created.

Tutorials-Speech/Thought Bubbles


Speech and Thought Bubbles

Tutorials-3-D Rings


3-D Rings

Tutorials-Radial Flowers


Radial Symmetry:

These were really fun and amazing. The idea is to create 1 flower petal and then
rotate copies of it around a center. I don't draw very well, so I picked out a few images from the
symbol palette that's part of the Illustrator program. I then elongated the symbols into a "petal" shape and copied/rotated them. The red flower was made from a ladybug, the blue/green from a fish, the gray/yellow from a scorpion and the yellow/orange from a bonfire. :) For the purple flower, I just made an oval, and then "pinched" it a bit.

Tutorials-Gears


Complex Paths

Tutorials-Snowman


Basic Shapes


Word Cloud


There's a site called Wordle.net where you can generate these cool word clouds by just typing words. Initially, the site creates a "cloud" for you, but once you move the file to Illustrator, you can rearrange things and add effects to suit yourself.

Fish and Frog


This assignment was to use only circles and ovals to create these images. Illustrator has a handy tool called "Pathfinder" which allows you to "cut out" sections of objects to change their shapes.

Day 1

It's the summer of 2010 and I'm taking an Adobe Illustrator class at Palomar College in San Marcos, CA. The fact that it's summer is significant. Summer classes teach you everything you would learn during a regular 16-week semester...BUT....summer classes only last 6 weeks. So here we go with high-speed learning :)

(The dates of these blogs DO NOT correspond to the dates when the works were completed. With the help of a very patient and experienced classmate, I finally learned how to add to this blog 1 month after I created it.) Thanks, Josh!

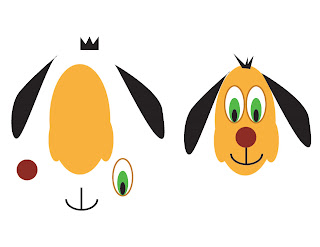
What you see below was our first assignment. The puppy pieces on the left needed to be manipulated and arranged to look like the puppy on the right. My rendition is the image with my name beneath it.
Tuesday, June 22, 2010

In the Beginning

This blog will feature work created during my Illustrator I class. Hopefully, it will not be an embarassment to me. ;)